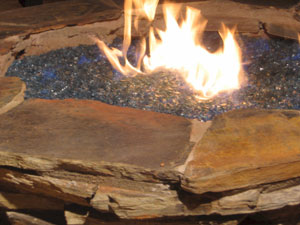
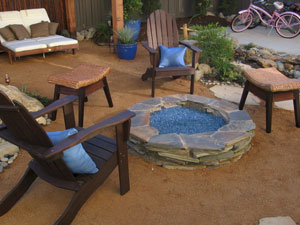
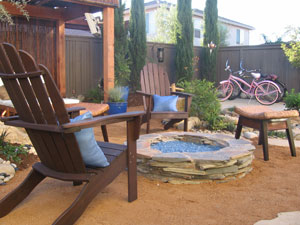
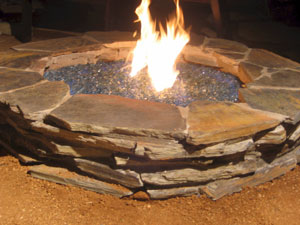
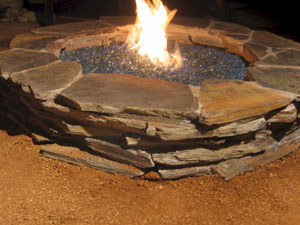
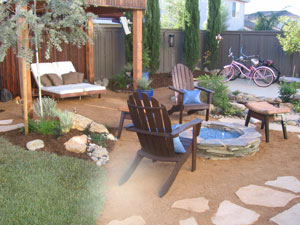
This backyard is transformed into the ultimate bachelor pad complete with all the glitz and glamour of a Vegas retreat, including a mahogany-stained bamboo cabana. A black slate fire pit provides a social gathering space and is topped off with bright blue fireplace glass to really put it over the top. A soothing water feature with a bamboo fountain completes the look of this backyard oasis and gives the feel of poolside Vegas luxury.
The fire pit below will be aired in early of 2008. The fire pit was filmed by Yard Crashers (www.BigTableMedia.com ) in Sacramento, California. A subsidiary of HGTV and Pie Town Productions. We will post air times as soon as we have them. But for now here are a few shots from the filming. Yard Crashers is a new program from HGTV who do complete makeovers in your back yard. Please contact www.BigTableMedia.com for details on how you can get involved!
Click here for our DIY Network TV Page
Materials
(4) 6" x 6" rough redwood
(7) 2" x 10" rough redwood (one will be extra)
(8) 2' x 4" rough redwood
(4) 6" x 6" post caps
4" heavy-duty wood screws
3" heavy-duty wood screws
(8) 60lb. bags of concrete
2" finishing nails
tie wire
bamboo flexible fencing in 8' and 3' lengths
(10) bamboo caps, also known as half rounds
Step 1: Set the Posts
To ensure that your cabana stands up to the wind and lasts, it's important to properly set your posts. Determine your size and mark spots for four posts. Dig holes 14 inches wide and 2 feet deep. Pour some dry quick-setting concrete in the bottom of each hole and set a 6" x 6" rough redwood post inside. Attach a level to the post and check it as you pour dry concrete around it. Expect to use about two 60-lb. bags of concrete in each post hole. All of the posts should line up with those to the side and behind or in front, creating a perfect square or rectangle. Once they are in the right place, add water to the concrete. Tamp down to get rid of any air bubbles and check your level again.
Step 2: Add the Crossbeams
Using 4" heavy-duty wood screws, attach 2" x 10" rough redwood crossbeams on the outside of the posts to box this structure in. Adjust this height according to your preference, making sure you have enough room to walk under it, leaving a foot or two of the posts sticking up from the crossbeams. (The posts may not be even, but you'll cut them down later.) Double up by adding 2x10 crossbeams on the inside as well on the front and back of the cabana.
Step 3: Add the Roof Planks
Using 3" heavy-duty wood screws, attach 2" x 4" redwood planks across the top of the cabana, securing them to the inner crossbeams. Space them approximately 12 inches apart. This will provide a sturdy roof frame for the bamboo.
Step 4: Trim the Posts
Cut down the top of the posts so they all reach 12 inches above the crossbeams, or to your desired height. Top these with decorative posts. We used copper pyramid-style toppers.
Step 5: Attach Bamboo to the Roof and Back Wall
The exterior for this cabana is made of bamboo fencing. For an upscale look we used a bamboo with a mahogany stain. You can buy this stained or stain it yourself. Bamboo fencing comes in different lengths and is held together with one or more metal wires that run the length of the fence panel. Depending on the length of your cabana, you'll need one or two pieces of fencing to cover the back wall. If you need two panels, attach them at the last bamboo poles with a thick metal wire. To attach the bamboo to the redwood, drill pilot holes through the bamboo and use finishing nails to secure it to the posts on the back wall and the planks for the roof.
Step 6: Attach Bamboo to the Sides and Front
To attach the bamboo fencing to the crossbeams on the front and sides of the cabana, you'll have to make some cuts. A circular saw with a fine blade will cut through the bamboo without causing it to splinter. Cut around the wire that holds the fence together so it will stay in one piece. Once you've cut your pieces, drill pilot holes where you will attach them to the redwood. To keep the bamboo pieces from twirling around when you mount them, lay them on a 2" x 10" board and push this right up to the crossbeam. Slide the 2x10 aside as you attach the bamboo with finishing nails the whole length of the crossbeam. Repeat this for the other two sides.
Step 7: Add the Bamboo Caps
Bamboo caps are pieces of bamboo that have been split in two lengthwise. We used a speckled bamboo for this. Place these over the tops and bottoms of the cut bamboo pieces that are attached to the crossbeams. Drill pilot holes and attach with finishing nails. Double up the bamboo caps along the bottom, one underneath the crossbeam and one across the front, if you want to completely cover the redwood. Cut small lengths of the bamboo caps to attach to the corners for a completed look.
Step 8: Add the Accessories
This structure just isn't complete without a few luxurious accessories. A double chaise lounge, an outdoor television and a couple of outdoor speakers bring Vegas home. Top it off by stringing some misters around the inside of the roof and it will feel like you're poolside.
Project No. 1: Vegas-Style Cabana. People pay big bucks to relax in the cabanas at Vegas resorts so why not bring Vegas home? The materials and design really set this cabana apart from others. It's a unique project sure to impress as it adds a level of casual sophistication to the landscape.
Materials
mortar
concrete
black mariposite slate
fire ring
lava rock
3/8" crushed lava rock
fireplace glass (Aquatic Glassel)
- Excavate. Determine the size of your new fire pit and excavate the entire inner area.
- Build "doughnut" form. The stone border of the fire pit will sit on top of concrete but in order to set this concrete, you need to build a circular form, or "doughnut." Cut two lengths of bender board, one for an outer circle and one for an inner circle. The bender board piece for the outer circle should be the length of the perimeter. The piece for the inner circle should be small enough so the gap between the two pieces is about five inches. Nail the ends of the bender board pieces together to form the two circles.
- Pour concrete base. Mix dry concrete with water and pour this in between the two circles (figure F). Smooth out the concrete with a trowel, adding pressure to force out any air bubbles. Let this dry overnight.
- Build the stone border. We used a black mariposite slate for this border but you can use any stone you prefer, as long as the pieces are one to two inches thick. Place one layer of stones on top of the concrete base before adding mortar. Choose pieces that fit together like a puzzle without jutting out much beyond the concrete base. To lay the stone, mix mortar with water until it becomes a medium consistency, like a thick brownie mix. Lift one of the stones, and use a trowel to apply the mortar to the concrete. Set the stone back on top and settle it into place. Don't worry about the mortar that squeezes out from underneath the stone; you'll use a sponge later to clean it up. Repeat this for all of the stones in the first layer. For each additional layer, offset the stones to cover the seams of the layer below it (figure G).
- Clean up excess mortar. Take your trowel around the outside of the fire pit, scraping off the excess mortar that has accumulated. You can do the same to the inside but you won't end up seeing the inside. Once you've scraped most of it off, go back around with a wet sponge and a bucket of water to remove any excess mortar from the stones.
Fill it up. First, add lava rock to cover the very bottom of the fire pit in one layer only (figure H). Second, attach the fire ring to the gas line. Third, pour in 3/8" crushed lava rock up to the point where it covers the fire ring (figure I). Last, add fireplace glass to completely cover the lava rock. Fireplace glass is a tempered, decorative glass that won't pop in the heat of the fire. It comes in a few different shapes and many different colors from www.Moderustic.com (figure J).


Figure F

Figure G

Figure H

Figure I

Figure J
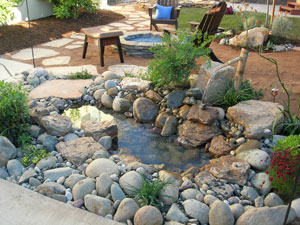
Project No. 3: Water Feature
Materials
fill sand
rubber pond liner
small to medium stones
boulders
plants
bamboo fountain with pump
A water feature can be whatever you want it to be, and in this case it started out as a big heap of assorted rocks and pebbles. Using some of the existing material we transformed this into a shallow pond, incorporating larger boulders, plants and a bamboo fountain.
- Excavate. First, remove any existing plants, rocks and debris from the area. Then dig out the shape of your new pond. We chose a rounded shape that dipped down to a depth of about two feet at one point, creating the pool end. This isn't deep enough for fish.
- Add a layer of fill sand. Cover all of the soil with a layer of fill sand, one to two inches thick. This will act as a cushion for the pond liner you will lay down next and keep it from ripping if it's in contact with any small rocks or hard chunks in the soil. Around the edge of the pond, build up the sand a little higher and taper it off around the sides.
Cover with pond liner. Pond liner will basically keep your pond clean by separating soil and sand from the water. The thicker the liner is, the less likely it is to tear but it should still be flexible enough to mold into the shape of the pond (figure K). If you need to use more than one piece, overlap the two pieces by a foot or more so you don't have leaks. Lay down the liner so that it completely covers the pond with excess on all sides. It should fit up and over the border you created with sand. Use rocks to pin the liner in place all around and cut it to the right size.
RESOURCES :
project materials
Moderustic, Inc.
www.Moderustic.com
project materials
SunBrite TV
Website: www.sunbritetv.com
project materials
Ewins
Website: www.ewins.com
Transform your landscape with host Ahmed Hassan.