Custom Fireplace Surrounds Fireplace Frames
Getting a Custom Surround requires:
- Photos of the area it's to be installed in
- And ideally a cardboard mock-up of what you want the surround to look like
Keep in the Mind While Constructing The Cardboard-Mock up the Following:
- How Thick or Thin do you want the frame to be?
- Do you want some form of glass within the interior frame of the surround?
- What type of metal? Steel. Aluminum, Stainless Steel, Copper?
- And lastly what sort of finish do you want the metal to have?
Average cost for 48" wide simple standard surround:
We manufacture each and every surround one at a time. We can build your surround to your specs, sizes and or criteria. Please send us a few pictures of your project, as it is now if you can. This will help us better understand what you are working with. We generally start with a cardboard template (cardboard machete) as this process will help you to better understand what the finished product will look like. If you dream it, we will build it!
Pricing:
Aluminum up to 48" wide = $1,050.00
From 48" to 60" wide = 1,450.00
Stainless Steel up to 48" wide = $2,100.00
90 degree surrounds up to 30” x 48” x 36” tall = 1,750.00
Stainless steel 90 degree surrounds up to 30” x 48” x 36” tall = 2,900.00
Pricing is based on needs and desires
Plus shipping and crating.
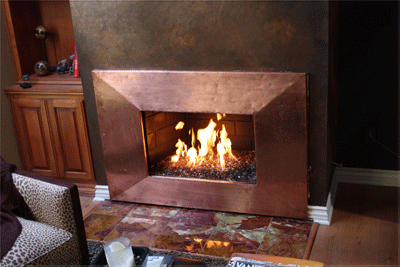
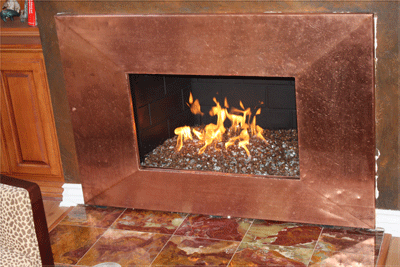
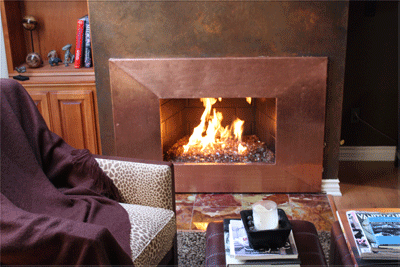
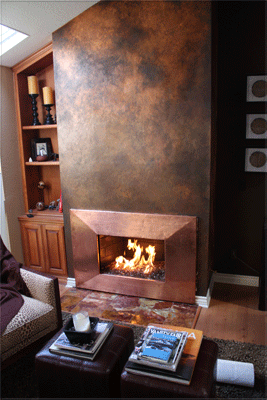
Click "Here" to see how this fireplace was transformed to this! Or on the picture.

____________________________________________________________________
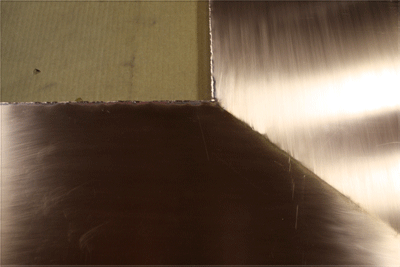
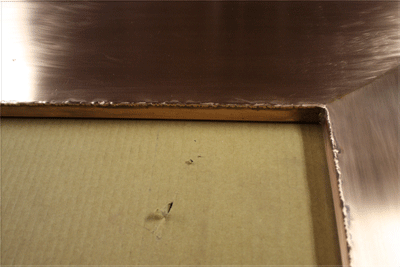
The next surround is just one large fireplace surround from aluminum which is brushed. We also built a floor base to rest the very large surround on top of.


We build everything we sell. This pictures was not cropped as one of my project cars was on the rack above the surround. Does anyone know what it is? Good question. I have built over 2 dozen cars in the shop, we are just now going to start to display what we have built.


_______________________________________________________________________________________
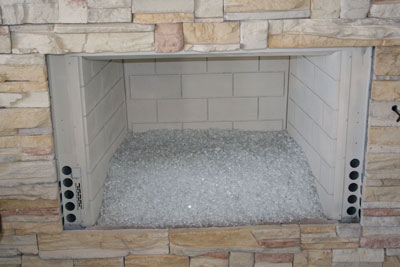
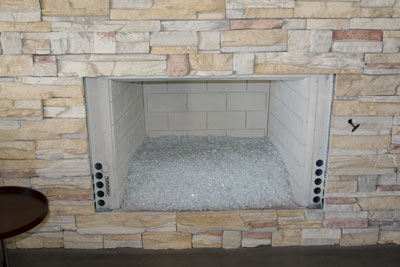
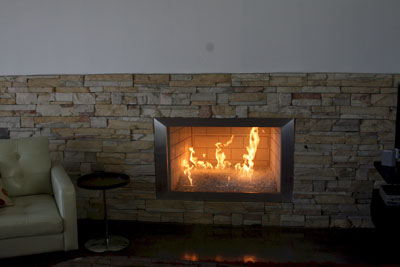
Below a long narrow fireplace in Palm Springs looks rather sparse without one of our custom fireplace surrounds.
Below the cardboard mock-up is mounted giving the customer and us a strong working idea of what it will look like and equally assure the customer of its design.
Once the details are hammered out, the stainless steel surround is produced and mounted on the wall. Along with some Gray Base Glass, Starfire Base Glass and Pyrite Base Glass FireGlass.
Beautiful room completed with a beautiful surround.

___________________________________________________________________________________________
Terry and Holly Utley had a direct vent fireplace, and as usual they were told that they couldn't convert to FireGlass. So we had to go and do the impossible again modify the system to work with FireGlass.
We then begin with the fireplace surround install, sadly though even with the surround in place the electronics are still exposed, so we had to add a few more pieces to add to assure a clean, finished look.
Now that's much better.
The fireplace is complete with some of our Starfire Base Glass and Cobalt Toppers. Turned out great, thanks ladies.

Our client Rich Guerra put us to the test with this custom fireplace surround, that went above and beyond the call of duty. As you see here the first Surround served as the base for the stone encasing - which will later demonstrate itself as very ingenious/fast/hassle free solution to getting a new fireplace design.
Here is fireplace before the 1st Surround was installed with the old burner and grill removed.
We apply a fresh coat Black fireplace paint and we sit and watch paint dry...
Look closely as you could miss it, but the first surround has been installed with the rock finish. We then pour some crushed lava rock as filler with Bronze Rust Copper Base Glass over a double 24" indoor fireplace burner.
Now the 2nd Surround is installed, along with one 8" Dark Brown FireBall and two 6" Red FireBalls.
The 2nd Surround was Steel construction with a Dark Bronze powder coat and frosted glass inlay. Overall the installation of the Surround gave the fireplace an extra depth of 6 inches.
A radical transformation which only took 40 minutes to complete and without all the mess and drama of reconstructing your fireplace.
Yet to come is a few pounds of Copper Ruby Red Topper and interior lights to spotlight the fireplace when its not burning.

___________________________________________________________________________________________
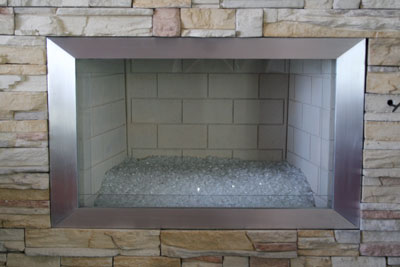
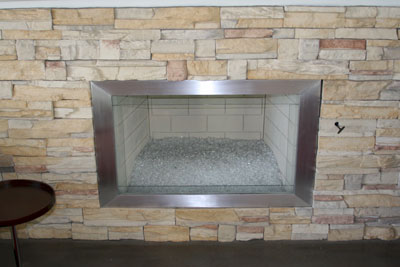
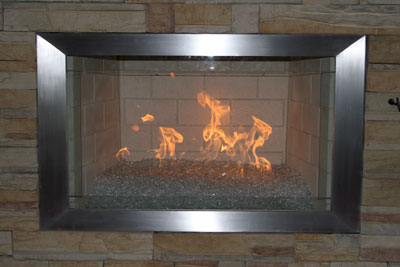
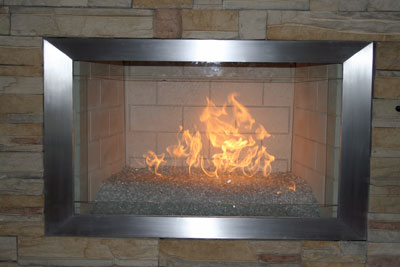
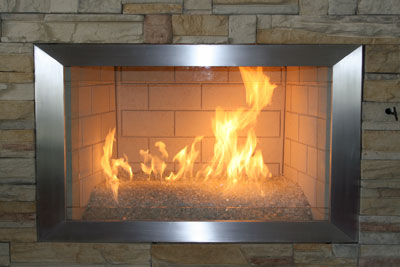
One of our largest custom surrounds, for a surprisingly small fireplace. This brushed Aluminum Surround had an overall of 55" x 44" with a double beveled edge, black glass between the Aluminum frames, and interior frame of frosted glass.

Here's what we walked into.
Created in two pieces the inner frame was the last piece to be mounted.

___________________________________________________________________________________________
Here are some great Before pictures from our customer Abbe Fenimore. Sending high quality digital camera photos help us "be there", without the cost to you for us being there.
A short while later, Abbe had his tile replaced before installing his custom surround. Further, you can see the cardboard mock-up on the right hand-side picture. Having done this Abbe is able to really determine his preferred surround size / look / feel, before it actually goes into construction. NOTE* Custom work cannot be returned.
Here the brushed aluminum surround is at last installed along with some Clear Base Glass FireGlass and a double 18" inch steel fireplace burner.
Everything turned out beautifully, Abbe your living room turned out amazing!

These photos come to us from our customer Robert LeWinter, who got the complete Moderustic package. Starting with a a fresh coat of Metallic Charcoal fireplace paint, Starfire Base Glass FireGlass and a one of a kind custom Surround.
Since Robert purchased a light colored FireGlass (Starfire Base Glass) he used a playground sand as base before placing his steel fireplace burner on top of the sand.
The fireplace was completed with installation of his custom Aluminum Surround adorning the fireplace.
Thanks for the great pictures Robert, fireplace turned out great!

This 3 sided Surround demonstrates the flexibility of custom work. Traditionally designed with four sides, this particular fireplace clearly is better suited with only 3 panels.
Sand base with a steel 24" fireplace burner atop providing some great flames.
The Surround was all steel construction, powdered coated gray, with a 2 inch frosted clear glass inside edge.
___________________________________________________________________________________________
These pictures come to us from our customer in Huntington Beach CA. They not only converted their fireplace to burn FireGlass but ordered a large custom Aluminum Surround. In the first photo you can see the fireplace freshly painted and emptied ready for FireGlass.
Here the FireGlass and new natural gas burner has been installed. With the proceeding picture showing the clients cardboard mock-up; the mock-up is a great way to gauge the size / shape of the surround before producing it. Remember custom work cannot be returned.
The aluminum surround was brushed horizontally with an 1 1/2" frosted glass inside edge. Inside the fireplace we see Black Base Glass and Black Reflective Base Glass FireGlass.

___________________________________________________________________________________________
Jeff Walls Fireplace Upgrade
There were a lot of ideas surrounding what Jeff Wall's fireplace would become...and when we arrived we found a lot of beer and "interesting" wood frame around the fireplace. As well as the typical dirty mess from burning logs.
After some discussion though it was decided that it wasn't the best direction to go. And the frame had to come off - especially if the custom surround was to be installed properly.
So once we cleared out the $350 worth of lumber, we went to getting the area prepared for the custom fireplace surround, a fresh coat of fireplace paint, a new indoor fireplace burner, FireGlass and a few FireBalls.
With the fireplace painted, a bed of playground sand in place and the new fireplace burner installed we are ready for the finishing touches.
Were still waiting for Jeff to send us his evening photos of the the fireplace completed. But here you can see how beautiful everything works together.

Kathy K. had placed her fireplace burner too far back, and as a result got a lot of ugly sooting on her wall.
So when started to work with her on her new Custom Surround we explained that her fireplace burner should be closer to the front so to avoid this again.
To ensure an accurate fit and design we guided Kathy on how to build an inexpensive cardboard mock-up.
The taped area represents the frosted glass and the cardboard represents what will be the brushed aluminum.
This gives both the client and us, a good general idea of what to build and what it will ultimately look like.

And here is the finished piece installed, freshly re-painted and burner installed in the right position :)
___________________________________________________________________________________________
This beautiful copper fireplace Surround was built for Stacey in Laguna Niguel, CA. The fireplace surround looked great against the faux painted walls. The FireGlass used was Bronze Rust Copper Base Glass.
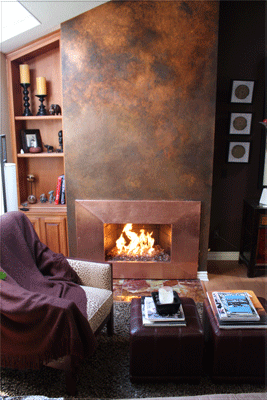
She requested a distressed unfinished look to the copper Surround. You can see here the interior rough edges being welded and polished to achieve that distress finish.

And here are a few more pictures of the completed job in her beautiful room.
___________________________________________________________________________________________
These pictures were sent to use from our customer in Palm Springs CA. It's a perfect example of the type of FireGlass that really gets a face-lift from having a surround. The custom fireplace surround was designed specifically to our customers measurements and desired look. In this case our customer requested a brushed finished with clear glass edging.
And here is the surround installed. And in case your curious the FireGlass installed was Starfire Base Glass and the interior was painted with ivory white stove paint.
This custom fireplace surround has 4" sides and 3" top and bottom. Every fireplace is a little bit different as we recommend a cardboard template so you can get a preview of what it will look like before hand. It just looked so good, we posted all photos!
___________________________________________________________________________________________
The next few pictures were sent to us by Marsha Dashefsky from Palm Springs, CA. Marsha wanted a custom floor-to-ceiling brushed aluminum fireplace surround.

Well, she got it!
The fireplace has 1/4" Clear Base Glass and then we added 1/2" Clear Base Glass and 1/2" Starfire Base Glass. The aluminum can take on a soft or brilliant looks depending on the lighting. The next several pictures are of and with the blinds open.
___________________________________________________________________________________________
Another Brushed Aluminum fireplace surround with an inside frame of clear glass.

Go To Fireplace Surrounds Page 1
Go To Fireplace Surrounds Page 2
Go To Fireplace Surrounds Page 3

Allan Chang Surround
Here is the original Document that Allan Chang sent us "CLICK HERE"
__________________________________________________________________________________________

Robin and Debby Soufer Surround
___________________________________________________________
Click "HERE" or on the picture below to see how this was made!

_____________________________________________________________________
Larry Kraines Fireplace Surround

__________________________________________________________________________________
The picture below is of the completed Fireplace Surround, Direct Vent Conversion, FireGlass installation and the FireBalls Looks great!
Click "HERE" or on the picture below to see how this was made and installed.

___________________________________________________________________________________________
Other Custom Projects of Interest

Currently under-development, our latest product "tubED" is
a fire feature that uses sound waves to electronically excite
gas molecules. Check out the Video Here.
Tradewinds Fire Pit (click here)
Dallas Fire & Water Fountain (click here)
Dave Sutton Table (click here)
Fire Tables and Portable Fire Pits (click here)
Dominick's Fire & Water Fountain (click here)
Here Is A List Of Our Many Unique Products

|
High Quality Base FireGlass - Check it Out! |
 |
Decorative Accent Toppings/ Toppers - Check it Out! |
 |
Fireplace Burners
150 different types of burners Single, double, triple, H pattern, Double H pattern, Triple H pattern to name a few. Check it out! |
 |
Metal Fire Rings
Rounds,with and without centers, singles, doubles, triples, quads and quints (5) half rounds,star burners, u burners, h burners and on and on. And if this is not enough we will custom build a burner to your specifications. Any and or all of these burners can and will be calibrated to burn propane or natural gas. Check it Out! |
 |
Propane Pans
In brushed aluminum, stainless steel, brass, copper, steel or any other metal finish you would desire! Check it Out |
 |
Fireplace Fire Balls
Available in painted or Glazed and Hallow. Color options included RED, LIGHT BROWN, DARK BROWN, SILVER, BLACK, WHITE, DARK GRAY, LIGHT GRAY, FOSSIL TERRACOTTA. Check it Out! |
 |
Fireplace Clay Stones and Concrete shapes and Balls. Available in various sizes and colors.
Check it Out! |
 |
Cookie Cutters For Your Fire Pit
Available in any size or design! Choose your colors from our large selection of FireGlass and we build custom frames that match your logo. Put this in your fireplace or fire pit Check it Out! |
 |
Custom Fireplace Surround Frames Our surrounds can be made from Aluminum or Stainless Steel, or whatever material you like. There are often small imperfections, but that's because they are hand made; not machine manufactured. Check it Out! |
 |
Vortex Fires
For both indoor and outdoor. With optional remote control, propane conversion, vinyl or marine vinyl covers, and pedestals. Size and cost range from:
18" x 18" by 36" high, with windshield.
Clear glass = $1200
Reflective = $1600
18 x 18 by 48" high, with windshield.
Clear glass = $1200
Reflective = $1600
Without Windshields
12" x 12" by 36" high
Clear glass = $800
Reflective = $1200
12" x 12" by 48" high
Clear glass = $800
Reflective = $1200
Check it Out! |
 |
VortexED 55
An alcohol based Vortex specifically designed for indoor use. We offer several creative options using clear glass with various metal bases and stands. Sizes range from
4 x 4 x 12 High at $80.00
4 x 4 x 14 High at $90.00
5 x 5 by 14 high at $100.00
6 x 6 by 18 high at $180.00
8 x 8 by 24 high at $240.00
12 x 12 by 30 high at $280.00
Extra charges apply for Aluminum, Stainless Steel, Copper, Brass, etc
Check it Out! |
 |
Portable Fire Glass Fire Pits
Available in both propane and natural gas. These are made from perforated aluminum or whatever material you'd like. We can customize these to suit any size, shape or material, even with wheels! Check it Out! |
 |
Black Magic, Blue Flames
Our black magic sand will give your fire pit or fireplace that WOW factor you always wanted. Check it Out! |
 |
Stainless Steel Bowls
Our bowls can be made from various materials and designed to your custom needs. We often use these bowls for fire & water features with colored fiber optics lights. Check it Out! |
 |
Large Custom Fire Features
No job is too big or too small. We can provide the right type of custom burners and FireGlass to fulfill the toughest commercial job expectations. Check it Out! |
 |
Small Custom Fire Features
We've helped thousands of people with their custom fireplaces. From homes in Beverly Hills to boutique Hotels. There's no project we fear.
Check it Out! |
 |
Fire Tables with Fire Glass
Want beauty & function together? Custom fire tables provide warmth and elegance. Commercial or residential, no problem. Check it Out! |
 |
Indoor Fires
We've worked on some amazing indoor fire tables over the years. Propane or Natural gas jobs.
Check it Out! |
 |
Outdoor Fire Pits
Our FireGlass can make any fire pit look better! Check it Out! |

|
Custom Water and Fire Features
We fear no custom jobs. From propane or natural gas flames, water features combined with fiber optic color lights. Just ask, chances are we can make your dreams come true!
Check it Out! |
Allan Chang Surround
Here is the original Document that Allan Chang sent us "CLICK HERE"
Larry Kraines Fireplace Surround
____________________________________________________________________________________
This Star Burst Surround has frosted glass which illuminates when the fire is on.

The Surround below is a Star Burst without any inner frosted glass

Click on the Pictures to see the Star Burst Surrounds
____________________________________________________________________________________
Click HERE to see the ses of the Stainless Steel 3 Sided Surround Pictures


______________________________________________________________________________________
_______________________________________________________________________
Click HERE or on the picture below to see how we built this feature

_______________________________________________________________________
Click below or on the picture below to see step by step makeover

Also see: The links below on other completed surrounds, frames and metal work
http://www.moderustic.com/Fireplace-Surrounds.html
http://www.moderustic.com/Surrounds-Continued.html
http://www.moderustic.com/Surrounds-PG-3.html
http://www.moderustic.com/Allan-Chang-Surround-1.html
http://www.moderustic.com/Robin-and-Debby-Soufer.html
http://www.moderustic.com/Beaumont-Surround.html
http://www.moderustic.com/Rick-Bray-Surround.html
http://www.moderustic.com/White-Fireplace-Surround.html
http://www.moderustic.com/Jeff-Jampol-Project.html
http://www.moderustic.com/Jeff-Jampol-Outdoor-Fireplace.html
http://www.moderustic.com/Jeff-Jampol-Livingroom-Fireplace.html
http://www.moderustic.com/Jeff-Jampol-Office-Fireplace.html
http://www.moderustic.com/Jeff-Jampol-Bedroom-Fireplace.html
http://www.moderustic.com/Mitered-Stainless-Steel-Surround.html
http://www.moderustic.com/Big-Surround.html
http://www.moderustic.com/Corner-Surround.html
http://www.moderustic.com/Laguna-Beach-Surround.html
http://www.moderustic.com/Starburst-Surround.html
http://www.moderustic.com/Joe-Yuga-Surround.html
http://www.moderustic.com/Alberto-Stevans.html
http://www.moderustic.com/Simon-and-Roberta-Hollis.html
http://www.moderustic.com/Jasmine-Bals-Fireplace-Surround.html
http://www.moderustic.com/Cheryl-Ward-Fireplace-Surround.html
http://www.moderustic.com/Jenny-Fireplace-Surround.html
http://www.moderustic.com/Rick-Rogina-Direct-Vent-and-Surround.html
http://www.moderustic.com/Dr-Micheal-Marshall-Surounds.html
http://www.moderustic.com/John-Corona-Fireplace.html
http://www.moderustic.com/Steve-Clendenen-Surround-and-Hidden-Ignition.html
http://www.moderustic.com/Barry-DeBreau-Corner-Surround.html
http://www.moderustic.com/Star-Burst-Surround.html
http://www.moderustic.com/Stainless-Steel-3-Sided-Surround.html
http://www.moderustic.com/Rosanne-Rosanne-Bandana-Surround-Mantle.html
http://www.moderustic.com/Larry-Kraines-Fireplace-Surround.html
Sterling Silver Panels, We are the only manufacture of mirrored panels on the market, check it out.
http://www.moderustic.com/Sterling-Silver-Fireplaces.html
and
http://www.moderustic.com/Mike-and-Megan-Boling-Fireplace.html
several movies on this page at the bottom.
and
http://www.moderustic.com/Sterling-Silver-Panels.html
The panels come in 6 colors/ shades, Bronze, Gray, Black and each in reflective with chromium or sterling silver.
In most average fireplace s the panels are $125.00 each (up to 3 square feet) if a notch is required to clearance the gas line, add $55.00. Typical fireplace if you are doing all 3 panels is $500.00 or just the rear panel = $125.00
See Movies here:
http://www.moderustic.com/Movies-Movies-Movies.html
Go To Fireplace Surrounds Page 1
Go To Fireplace Surrounds Page 2
Go To Fireplace Surrounds Page 3


 fireplace surround")